|
If you are having problems in getting viewpoint optimization to work properly, this tutorial is for you. It covers the final stage in the preparation of a full 360x180 degree panorama - i.e.the patching of the tripod area with either a handheld shot of the unobstructed nadir area, or one taken with the camera still on the tripod but after shifting it sideways to give an unobstructed view, albeit from a somewhat different viewpoint. If you want to play along, there's an accompanying download containing all the images together with a project file saved at the point when the optimization of all the images apart from the nadir has been completed. Download from: http://www.johnhpanos.com/vp_tut_files.zip (15MB)
|
|
PROJECT SETUP Unzip all the files to a folder of your choice. Apart from the partially complete project file (vp_tut_initial.pts) there are 10 fullframe fisheye image files:
6 around at pitch = 0 There's also a fully completed project file - vp_tut_final.pts. To ensure good blending, masks
have been applied to the down shots in the supplied project
files. The masks exclude unwanted parts of the images - such
as the tripod/panohead (and its shadows) and my body parts.
The masks look like this: 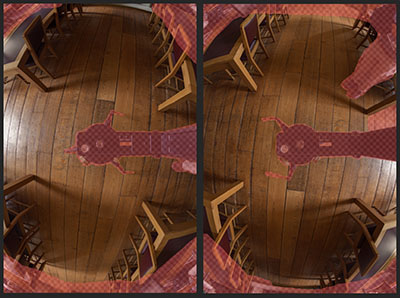 |
|
LOAD IN THE PROJECT Launch PTGui Pro and open the project file vp_tut_initial.pts (not the final version) with File->Open Note that (for simplicity) the viewpoint nadir shot has not been initially included in the project. Select Advanced mode on the Project Assistant tab and select the Optimizer tab. Use the Advanced mode there also:
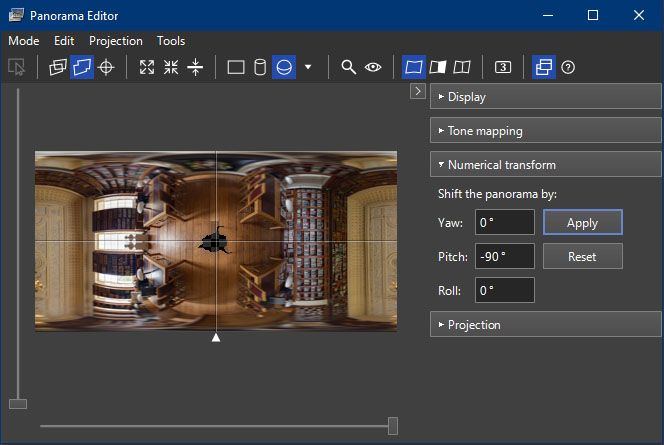
Click on the Run Optimizer button to confirm the current optimization state: Now, with the Panorama Editor window displayed, select the numerical transform option on the fly-out panel at the upper right of the window (click the [ < ] icon to pull out the panel if necessary). Set the pitch parameter to -90 and click Apply. The Panorama Editor display (equirectangular projection, 360x180) will look like this:
Note that performing this transformation is optional, but it helps in giving an undistorted view of the nadir area so you can see more clearly what's going on there, and manual adjustment of the nadir image's position is much easier should that need to be done for any reason.
ADD THE VIEWPOINT NADIR IMAGE Select the Source
Images tab and use right click on any of the lines to select
the "Add images" option to add the viewpoint nadir image,
which will become image 10. Or simply drag the image
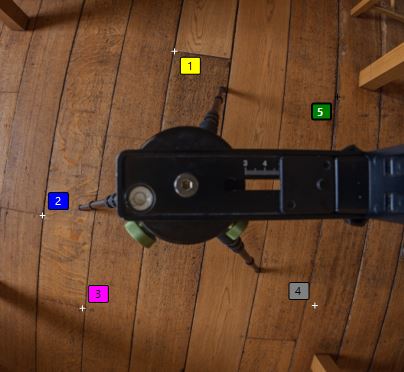
from the project folder into the main PTGui panel. Select the Mask
tab and create a mask for the newly added image, similar to
the one below. You need to hide anything not part of the flat
plane of the floor. (Any objects sticking up like tables and
chairs are likely to become distorted by the viewpoint
correction). 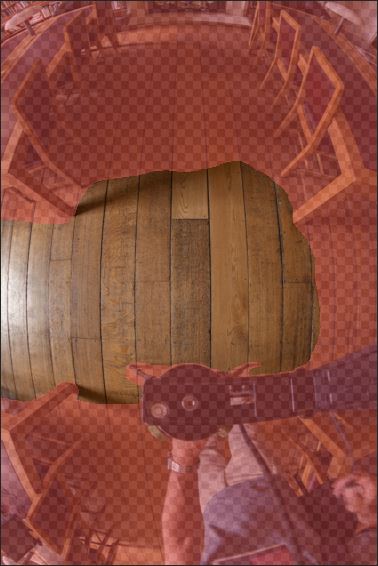 Select the Control Points tab and automatically generate control points between images 8 and 10 (from the Control Points menu). If that doesn't yield at least four points, add four or five five points manually like this: Four or five
points should be enough, but you may add a few more later
automatically using the "Generate control points here"
function to fine tune the alignment once the nadir has been
reasonably well aligned using viewpoint optimization.
Tip: Zoom the windows to 100% to see small spots and blemishes
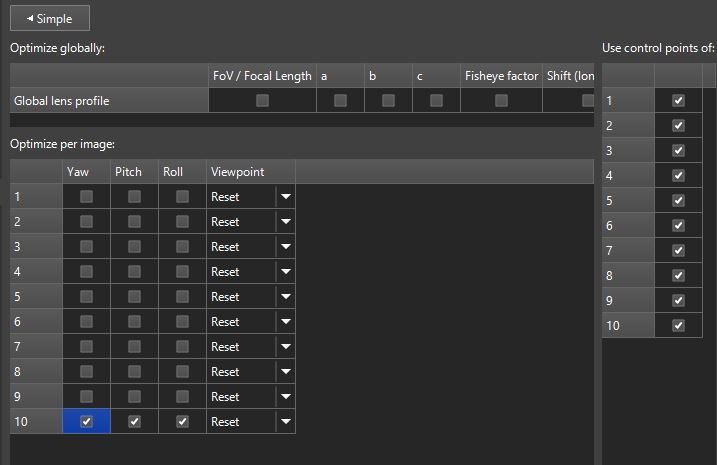
that can be used for placing control points accurately. Optional, but recommended: select the Optimizer tab and uncheck all the present lens and y,p,r settings (double click column headings), and then check just y,p,r for the viewpoint nadir. All boxes in the "Use control points of" table should be checked:
This ensures that whatever happens in subsequent optimizations, the alignment of the main panorama images will not be disturbed. Now click on the Run button to optimize the viewpoint nadir roughly into the right position. A poor result will likely be reported owing to the nadir not being shot from exactly the same viewpoint as all the other images.
This is to be
expected and is usually nothing to worry about if the nadir
image ended up in roughly the right area. If not, check the
control points and maybe help things along by dragging the
nadir into approximately the right position manually before
repeating the optimization. Otherwise, just click OK and carry
on. |
|
THE VIEWPOINT OPTIMIZATION Now additionally select Viewpoint optimization for the nadir image. 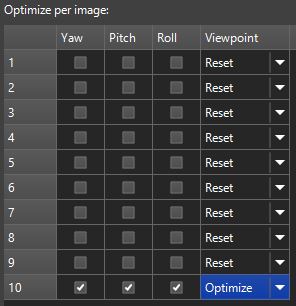 Run the optimizer once again. With any luck, a good result is now reported! Occasionally, the image might
not snap into good alignment at the first attempt. If
that should happen, try selecting the nadir image on the
Panorama Editor window (click the "Edit individual images"
icon), adjust the image position to align better by dragging
and rotating (right button held down), and then try optimizing
again - first with the Reset viewpoint option selected and
then with the Optimize option. Having got a decent alignment
with very few control points assigned, more points may be
added with the "Generate control points here" function to give
a better distribution, and a further optimization performed to
fine tune the alignment. Maybe run "Delete worst control
points" also, in order to discard any bad points. With a hopefully good result, you now need to restore the panorama to its normal orientation by applying pitch=90 with the numerical transform option. |
|
STITCHING To get the best blending, you
will probably need to run Automatic exposure and colour
adjustment on the Exposure / HDR tab. All that
then remains is to generate the panorama.  Even with viewpoint correction,
there might still be some very minor alignment errors for
pixel peepers to find. (You can run the Detail Viewer to
examine the image closely). Adjustment of the masks to
alter the seam position may then help. (The optimum seam
placement blending option in V12 should help to eliminate most
glitches automatically). Manual blending: In
difficult cases such as nadir areas not actually being a truly
flat plane, I generate two full equirectangular images: one
from all images except the viewpoint nadir, and one containing
only the viewpoint nadir (making use of the Include Images
list on the Create Panorama tab). You can then extract
rectilinear views of the nadir area from each panorama image
for merging in Photoshop, using whatever nadir patching
workflow you are comfortable with. E.g. by generating cube
faces from PTGui's Tools menu.. John Houghton |
| |