IMAGE SIZING
This note concerns the sizing of regular RGB colour images (e.g. from a digital camera or scanner) in the contexts of printing, viewing on a screen, and emailing.
IMAGE FILES
An image file consists of a rectangular array of dots or "pixels" (picture elements). For a regular 24 bit RGB image, the colour of each pixel is held in three bytes of data, one byte each for the red, green and blue components of the colour. So, for an image from a digital camera having the dimensions 1600 pixels wide by 1200 pixels high, the basic size of the image would be 1600 x 1200 x 3 bytes = 5,760,000 bytes = 5.76 Mbytes. (Here, I will use Mbyte to mean one million bytes, but the term is more usually regarded as having the value of 2 raised to the power of 20, i.e. 1,048,576).
PRINTING IMAGES
Embedded in the image file is a "resolution" value: e.g. 300 pixels per inch. It is this that determines the size of the file as it will be printed out on a printer. So, for our camera image of 1600 x 1200 pixels with a resolution set to 300, its printed size will be 1600/300 by 1200/300 i.e. 5.3" by 4". The printed size can be changed simply by altering the resolution setting of the file and keeping the same number of pixels so that you spread the same pixels over a bigger or smaller area (see resizing images below). It is generally accepted that for good photographic quality printing, you need to have at least 200 pixels per inch (and preferably more), which leads to a maximum print size of 8" x 6" in this case. (This is for prints to be viewed at normal reading distance).
RESIZING IMAGES
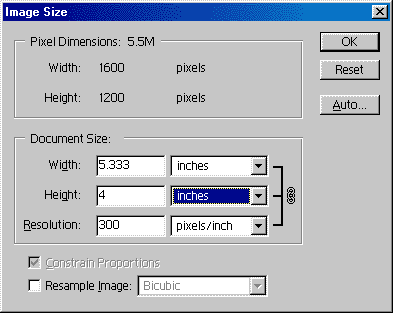
Most image editing software packages provide a facility for resizing an image, whereby you can change the dimensions of the image either in terms of pixels or in terms of length (cm or inches), or both. For example, the Photoshop image size option screen looks like this:
Starting with an image size of 1600 x 1200, the pixel dimensions can be halved to 800 x 600 and the file size will reduce to a quarter of its former value. This downsizing involves a process called resampling: each pixel in our resized image has to represent the average colour and brightness of four neighbouring pixels in the original image. Note that this process cannot be reversed exactly. Given one pixel, you cannot divine the properties of the original four pixels. So fine detail in an image that is lost when you downsize cannot be regenerated when you upsize, though some programs are more successful than others at producing a visually acceptable result. The key thing to remember is that when you change the pixel dimensions of an image, a process of resampling takes place which changes the file size. (Note that with Photoshop, you need to tick the "Resample Image" box to change the pixel dimensions. In PhotoDeluxe, image resampling is obtained by clearing the Constrain File Size box).
On the other hand, a change in the linear width and height (in cm or ins) of an image can be accomplished in two ways:
1) Change the resolution and keep the same number of pixels,
(no resampling - file size unchanged), or
2) Keep the same resolution and change the pixel dimensions,
(resampling leads to a file size change).
Either way, the linear (printed) size of the resulting image is pixel dimensions divided by resolution.
If you don't have an editor that has a resize option, you can use the freeware program IrfanView - from http://www.irfanview.com
DISPLAYING IMAGE FILES
Most image editors and general applications will display images at whatever sizes they choose, regardless of the files' resolution settings. More particularly, if you display your images in a web browser, such as Netscape or Explorer, it is important to understand that these ignore the resolution set in the file. So, for our file, it does not matter at all whether we set the resolution at 200 pixels per inch or 300 pixels per inch. What determines the size of the displayed image is the resolution setting of the monitor. For older PC’s with 14" or 15" screens, a picture size of 800 by 600 pixels is common. For a 17" screen it will often be 1024 by 800. For a 19" screen it might be 1280 x 1024. So, with a 14" screen, only half the width and height of our 1600 x 1200 image will be visible and we will have to scroll the window to see the rest of the picture. Even the 19" screen will not display the whole image. So, if you want everyone to see the whole of a picture without having to scroll the window, you need to restrict the size of the picture to no more than 800 x 600 pixels. Note: web pictures often have the resolution set to 72 by convention, but as stated above, it doesn’t really matter what it is.
If we resize our camera picture to 800 x 600 by resampling it, its basic file size will become 800 x 600 x 3 = 1.44 Mbytes, i.e. a quarter of its original size.
DOWNLOAD TIME AND COMPRESSION
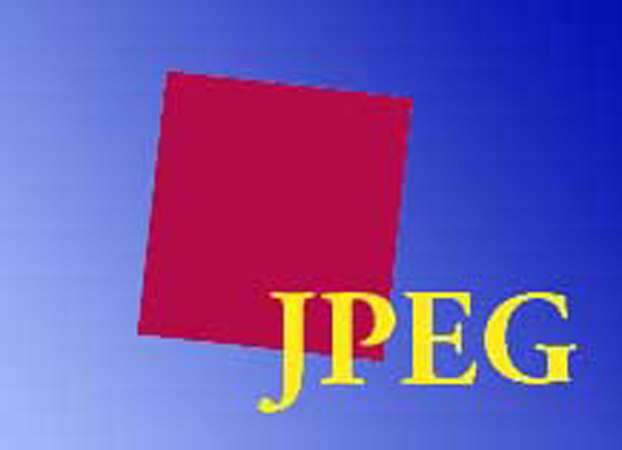
Images typically download from the web on home computers not equipped with broadband at a rate of around 3 Kbytes per second, and take the same time to email. Our 1.44 Mbyte file will therefore take 1440000/3000 = 480 secs = 8 mins. FAR TOO LONG! The solution is to compress the file by saving it in JPEG format. This is a "lossy" format - the more you compress the file, the more picture information is lost and the more picture quality is affected, but you might manage to reduce the file size to one twentieth and still end up with an acceptable image. NB. the conversion to JPEG format will NOT change the number of pixels in the image nor the resolution setting; the colour values of the pixels will simply be less accurately described. The enlarged picture below shows the imperfections ("artifacts") that are introduced into an image by an excessive amount of compression. Note the rippling effect round sharp edges and the blocking and banding in what was originally a smoothly graduated background.
When the compressed file is reopened by an image editor, it will be automatically decompressed. However, the picture information that was lost in the compression process cannot be regenerated and the picture will look just like the compressed version. Further, if you then recompress the picture by again saving in JPEG format, yet more information will be lost. You should therefore avoid repeated JPEG saves whenever possible. Instead, do interim saves to a non-lossy format like TIFF, or to the image editor's own proprietary format.
At a compression of 1/20th, our 1.44 Mbyte file slims to 72 Kbyte and therefore takes only 24 seconds to download - much more acceptable. In general, the load time is perhaps the most important parameter of a web file - nobody enjoys waiting for pictures to appear, however wonderful they might be, so try to juggle the pixel file size and compression to keep the load time to no more than 20 seconds or so, i.e. a JPEG file size of 60 Kbyte. But this is just a guide, not a rule.
For emailing and the web, you should use Photoshop's "Save for Web" option to compress the file. If you don't have this option, try the JPEG WIZARD. Like Save for Web, this JPEG conversion program interactively shows the results of compression (both file size and image artifacts) while you vary the degree of compression with a slider control, so you can finely tune the result you want. You can also apply differing amounts of compression to different parts of the image. (You may find an early freeware version of the JPEG Wizard if you do a web search).
Written
by John Houghton
5th December,
2005
Email: j.houghton@ntlworld.com