PTGUI AND UPSIDE DOWN IMAGES |
This tutorial concerns very common stitching problems that can arise as a result of the camera's auto-rotate feature being active. Auto-rotate is of course handy for getting images the right way up with no effort at all. However, for shots taken with the camera pointing directly up or down for the zenith and nadir, which orientation is the right way up? The camera doesn't know because gravity is acting perpendicular to the sensor plane, which means the auto-rotate sensor yields arbitrary orientation values.
|
Image requirements
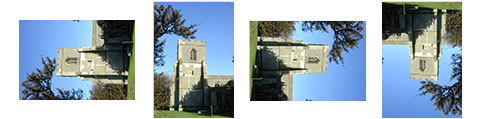
for PTGui Experienced PTGui users will be aware that for straightforward stitching, it is necessary that all the images in a project should be supplied in the same orientation. It doesn't matter to PTGui whether the images are all in portrait orientation or all in landscape orientation; the important thing is that they are all the same. But being all in landscape or portrait is not a sufficient requirement: images can be in four distinct orientations. Starting with the natural landscape orientation of the typical camera, the four possible orientations are obtained by rotating the image by 0, 90, 180 and 270(-90) degrees, like this:
|
|
Thus, there are two possible landscape orientations and two portrait orientations. Why is it important to choose the same one for all images in a PTGui project? |
The horizontal angle of view parameter (hfov) The
vast majority of stitching projects use global lens parameters,
which means that all of the images are assumed to have the same
horizontal angle of view. For a given focal length, the hfov will
be different for a wide shot taken in landscape orientation as compared
to a narrow one taken in portrait orientation. For the same hfov
parameter to apply to all images, clearly the images must all be
in the same orientation. However, it's very important to be aware
that it's the orientation of the image as opened by PTGUI that matters, not how the camera
was oriented when the shot was taken. The orientation as opened
by PTGui is fortunately easy to check since the image thumbnails
on the Source Images tab are shown in that orientation, which never
changes throughout the entire stitching process. These, then, should
all be shown in the same orientation. If all images should be in
portrait orientation, a landscape image will stick out like a sore
thumb, but an upside down image will be much less easy
to spot. For circular fisheye images, the hfov is specified neither for portrait nor landscape image widths but for the diameter of the crop circle. NB. While most projects will use global parameters by default, PTGui is well able to cope with a mixture of landscape and portrait images and/or a mixture of images taken with different lenses/cameras. This entails making use of the Individual lens parameters option on the Lens Details tab, together with advanced features that are outside the scope of this note. |
The horizontal and vertical shift parameters (d & e) These two parameters are used by the optimizer in the distortion correction process to compensate for the lens optical axis not being exactly aligned with the centre of the image sensor. This misalignment arises from mechanical tolerances in the assembly of the camera parts and is typically quite small – in the low tens of pixels usually. The misalignment might change as a result of adjusting focus or unmounting & re-mounting the lens. Obviously, if an image is upside down compared to all the others, its optical centre will be in a different position and the compensation shifts required will be in the opposite direction. Using the global shift parameters for that image will make the distortion correction worse rather than better.
|
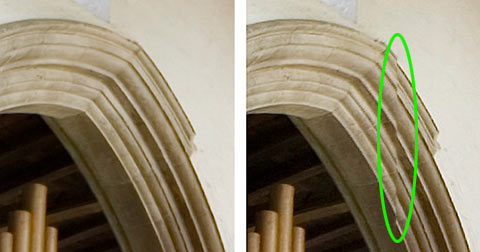
. . . and crop circle positions I first became aware of this upside down issue when stitching a panorama shot in Ashwell church in 2008 using a Sigma 8mm fisheye lens. I just could not eliminate several small glitches in the zenith seams, no matter what I tried. And then by chance I happened to notice that the crop circle for the zenith image was not accurately positioned on the edge of the image circle, as it was for all the other images. It finally dawned on me that the zenith image was simply upside down! Rotating the image in Photoshop resulted in the crop circle then being correctly positioned. I then did two versions of the project with the zenith right way up and upside down. The optimization reports showed the difference very clearly: |
|
The result was a perfect stitch for the zenith the correct way up. The same considerations apply to nadir images, of course.
|
|
Avoiding the problem Turn off the auto rotate feature in the camera. All the images will then be generated in the same landscape orientation. If shooting raw, all the images can be rotated together into the preferred orientation with one or two clicks during the raw conversion. This is the simplest way to avoid the problem completely. Another option is to tilt the camera up/down by 70-80 degrees instead of 90 when shooting the zenith/nadir shots so that the orientation sensor remains operational. You will still cover the holes, and with one edge of the frame much lower, you will have a better chance in finding features for control points near to the horizon. |
. . . but if auto-rotate has been employed in the shoot? Visually
check the orientations of the images and correct in Photoshop before
input to PTGui. Differences between landscape and portrait are obvious,
of course, but if you need to rotate an errant image from landscape
to portrait, which way do you rotate it? +90 or -90 degrees? It
really does matter. You can often deduce which way from an examination
of the images. For example, in the case of a nadir shot, you might
expect the vertical arm of the panohead to appear on the right of
the portrait image if that's how it normally appears after swinging
the camera down to point at the floor. And when swinging the camera
up to point at the ceiling, the details at the bottom of a portrait
image should match details at the top of the overlapping image in
the row below, shot from that same yaw position. In other words,
imagine looking through the viewfinder as you took the shots. Are
the images consistent with what you would expect to see? A more certain way of checking the image orientation is to display the value of the orientation parameter as filed in the metadata (exif). You can use Photoshop's Bridge to do this by displaying the Metadata panel (enable this via the Window menu). Look in the Camera Data section. If the orientation tag is not present, you may need to enable its display by visiting Edit/Preferences/Metadata. Rotate individual images as required to make the orientation parameters the same for all. |
|
In the case of circular fisheye images, check that the crop circles are consistently positioned on the image circle for all of the images. In all cases, the correction of the image orientations should be performed outside of PTGui, as the various methods of rotating the images PTGui provides will not alter the basic orientation as opened by PTGui - as shown on the Source Images tab. |
John Houghton |