STITCHING IMAGES WITH PHOTOSHOP
This tutorial explains how to join two images, such as partial scans of a large picture, into one seamless whole. By extension, any number of images may be joined together using the same technique. The tutorial is aimed at those with relatively little experience of PhotoShop. Although equally applicable to images taken with a digital camera (for a panorama), these are usually better stitched using specialist applications. PhotoShop version 6 is assumed but there are only minor differences using version 5 (arising from the changed location of the tool options).
THE SCANS
Extra care taken at the scanning stage will pay dividends in the later stages.
1. Ensure adequate overlap of the images - between 10 and 20% will be fine.
2. Disable any automatic image adjustment feature in the scanner software. The aim is to give the same exposure for each scan. If you don't do this, you will have extra work to do in balancing the brightness and hue of the images in PhotoShop.
3. If the image is a magazine or newspaper photo, consider using a "descreen" option in the scanner software (if available) to minimise the moire effects arising from the dot structure.
4. For the output files, select a lossless file compression format such as TIFF rather than JPEG.
5. Avoid unneccessarily high image resolutions, which can lead to very large file sizes. Bear in mind the final purpose of the image. For printing, between 200 and 300 pixels per inch is usual. (But don't confuse this ppi with the dots/inch resolution of the printer, which needs to be set for best quality. Several dots may be printed for each image pixel).
6. Try to align the original in the scanner the same for each scan. But don't worry, no matter how hard you try, some scanners seem to skew the paper slightly as you close the lid - almost as if this was a regular design feature.
SETTING THE CANVAS SIZE
The canvas is the image area within which you will perform the stitching. It needs to be a bit bigger than the final picture to give you a bit of elbow room to shift things around. So, open image file 1 in PhotoShop (or select the image if already imported by the scanner software). I always choose the left hand one but you can work right to left if you prefer. You need to increase the image area to accommodate the second picture. Select Image->Canvas Size from the top toolbar and click the anchor tile in the 9 o'clock position so that the extra space will be created to the right, and also to top and bottom.
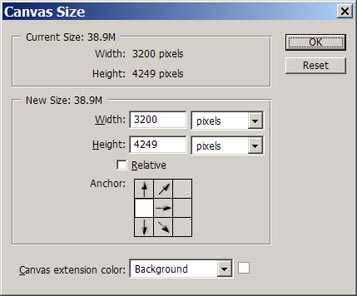
Enter a canvas width double the value shown and also increase the height by a small amount (don't worry about getting this "just right" - you can always further increase or decrease the canvas size any time later), then click OK.
IMPORT THE 2ND IMAGE
Open image file 2 (or select the window if already acquired). All you do is select the move tool, left click on this image (hold for a second) and drag across into the window holding the first image. Nothing will appear in the target window until you release the mouse button. A copy of image 2 will then appear and the original image 2 will remain unaltered. The image 2 window is no longer needed and should now be closed.
A WORD ABOUT LAYERS
The important thing to note at this point is that image 2 resides on a new layer. If the layers palette is not visible, click Window->Show Layers.
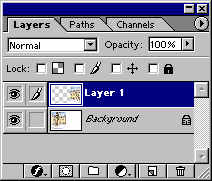
Check that that it shows a background layer holding image 1, and Layer 1 holding image 2. The top layer will be highlighted with blue, showing it is the active layer. When you want to work on a particular layer, just click it on the right hand side. The paint brush symbol indicates when you can write to the layer. Images in the upper layers will obscure the layers beneath, in the manner of the plastic sheets used for making Disney cartoons (in the pre-digital days anyway). Any layer can be rendered invisible by clicking on the associated eye symbol. Click the same box to switch it back on. If you have not done this before, try it now. On all layers except the bottom layer, you can erase all or parts of the image to allow underlying layers to show through.
ALIGN THE TWO IMAGES
Ensure the top layer is active. Click on the triangle to the right of "Opacity 100%" in the layers palette and move the slider to about 50%. You will now be able to view both images simultaneously in the overlapped area. Select the move tool and drag the upper image to align with the lower image. (Zoom in really close to the lower part of the overlapped area). Then check the top part of the picture to see how well that is aligned. If you are incredibly lucky, it will align perfectly. But life is cruel - it won't. You will therefore want to rotate the whole of the upper image by a small amount. This "small amount" you can measure very exactly using the measure (or ruler) tool in its protractor mode.....
ROTATE THE TOP IMAGE
What you do is switch off the top layer and with the measure tool (on the eye dropper button flyout) draw a line by click/drag from a good reference point near the bottom of the overlapped area to another good point near the top. Zoom in to do this. When you move the cursor up beyond the top of the window, the screen will scroll quite nicely until you return the cursor to the window area. Then switch the top layer back on and ensure the reference points at the bottom of the image coincide on the two layers. Change the opacity back to 100%. Draw another line between the same reference points on the top layer, starting at the bottom point but this time do ALT/click and drag to the top point. In this way you will have drawn a V shape. The angle of the V can be found by immediately going to Image->Rotate Canvas->Arbitrary, whereupon the angle will be set up for you in the window. But do not execute the rotate - click on cancel after noting the angle. (You get a more precise value for the angle this way instead of just reading out the value in the info panel, if you care to display that).
Make the top layer the active one and switch off the bottom layer. Surround the whole of the top image with a rectangular selection using the rectangular marquee tool. Then go to Edit->Transform->Rotate and enter the value noted for the angle into the options window at the top of the screen (negative for counter clockwise) and click the tick button. Then deselect by pressing ctrl/d or Select->Deselect.
CROP THE LEFT EDGE OF THE TOP IMAGE
Nearly done! Switch the bottom layer back on and reduce the opacity of the top layer once again and try to match up the images using the move tool. They should now line up exactly. Assuming all is well, make a rectangular selection that includes the left hand half of the overlapped area and goes well over to the left beyond the edge of the top image into the transparent area. Click Select->Feather and enter 10, say, followed by OK. Alternatively, you can preset the feathering in the option window before making the selection. Then (after checking that the top layer is active) hit the delete key. This will delete the selected area, leaving a nice feathered edge to the top image. Return the opacity of the top image to 100% and the join should now be perfectly seamless.
If there are any double images visible at the join, you can use the eraser to rub out parts of the edge of the top image to make the join follow a less sensitive path.
If there is a difference in brightness or hue between the two layers, carefully tweak the top image until the images merge satisfactorily. Tip - If there is a difference in hue between the two images, it is easier to correct this by separately adjusting the red, green and blue channels in black and white. Display the channels palette. Select each channel in turn and adjust brightness/contrast or levels. The channels should display in black and white. If they are coloured (red for the red channel etc), Edit->Preferences->General then select Display & Cursors in the pull down menu and uncheck "Color channels in color".
FLATTEN AND CROP
Finally, click Layers->Flatten Image to merge the two layers and use the crop tool to select a nice clean rectangle, rotating the selected area if necessary. Sharpen to taste, using Filter->Unsharp Mask and Save the file in the required format.
Written
by John Houghton
5th January,
2001
Email: j.houghton@ntlworld.com