SPHERICAL PANORAMAS WITH THE CANON D60 + SIGMA 8mm FISHEYE LENS |
|
|
|
The 8mm Sigma lens gives a full circular image in a 35 mm frame, but because of the 1.6 focal length multiplier factor of the D60, the circle gets cropped across the short side of the frame but just about covers the full 180 degrees across the length of the frame. It looks like this -> The cropping of the sides means that more than the usual 3 images need to be taken to adequately cover 360 degrees when the camera is used in the portrait orientation. 5 or 6 works well. |
|
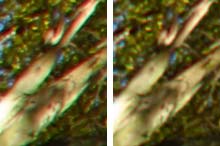
The image quality of the lens is generally good but there's some chromatic aberration at the edges that can be corrected by the radial shift feature of the Pano Tools Photoshop Correct plugin. I found that setting a=b=c=0, with d=1 (green and blue), and d=1.0013 (red), was quite effective, as shown in this crop from the top left of the sample image -> Much better chromatic aberration correction is possible using the RAW image converter in Photoshop CS, and the vignetting can be corrected reasonably too. The batch processing capability added in CS2 is also very handy for applying the same conversion settings to the set of images. For CA, I use -47 on the red/cyan slider. For vignetting: Amount +90, Midpoint 9. The PTLens plugin also has the capability of correcting CA and vignetting. |
|
|
|
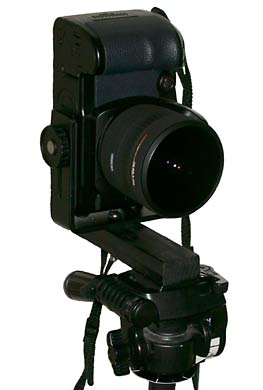
TAKING THE PHOTOGRAPHS To avoid parallax, it is highly desirable to mount the camera on a tripod such that the camera rotates about the entrance pupil of the lens (often erroneously called the nodal point). This seems to be positioned between the front of the lens and the bronze band around the barrel of the lens mount. (The entrance pupil actually moves about according to the angle of incidence of the light rays, so it's best to assure no parallax where the images overlap rather than in the centre of the lens). My home made mount for the camera looks like this -> Note that there is a 1cm deep collar fitted around the front of the lens mount into which the lens cap fits. The collar needs to be removed, otherwise the field of view will be restricted. |
|
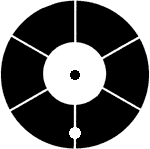
Hand-held camera: If you need to take the photographs without a tripod, then identify or place a marker on the ground and stand a few inches away from it. Take the first photograph and then move your feet around the marker, maintaining the same distance from it. Take successive shots in the same way. You can establish how far away to stand from the marker by hanging a key on a thread attached to the lens at the bronze ring. Stand comfortably, holding the camera up to your eye, and shuffle about until the key hangs just over the marker. Then note the position of your feet. I tried this method and it worked surprisingly well. I used this cardboard marker with 60 degree angles marked -> |
|
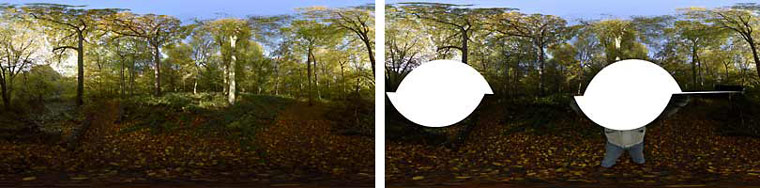
You can manage with 4 images to cover the 360 degree view, but a couple extra will do no harm and light fall-off or vignetting will be less of a problem. So take 5 or 6 photographs plus two vertically up and down shots (without the tripod in place) for patching in the zenith and nadir. For the latter, just stand with arms outstretched to hold the camera in the original position of the camera as best you can. Don't worry too much about precisely positioning the camera. The images will look something like this: |
|
|
|
|
|
STITCHING THE IMAGES WITH PANORAMA TOOLS It's recommended that you use a front-end gui interface program to make life easier - either PTGui, PTAssembler, PTMac or Hugin. Here, I will assume PTGui is being used. If using a PTGui V6 or earlier, you need to get hold of a patched version of Panorama Tools that does not have the angle of view of the lens limited to 160 degrees. It is the pano12.dll file that is important and this can be substituted with a patched version. (See Links below for latest Panorama Tools package). PTGui V7 can stitch without the aid of Panorama Tools and will handle fisheye lenses. In PTGui, first add the 5 or 6 images that were taken with the camera level. Assign the approximate angular yaw positions on the Image Parameters tab. (There's a Fill Yaw button that can be used to do this). My lens parameters work out as follows: Lens type = circular
(fisheye - type f2) (These are for the older f/4 version of the Sigma 8mm lens) On the Panorama tab, set projection type equirectangular, with a 360 by 180 view. Go to Tools->Options->Panorama Tools and set the crop format for lens F2 to be a circle. On the Crop tab, drag the crop circle to align with the edge of the image circle. Click on the "Apply to all images" button. (PTAssembler users don't have a crop option so the images should be manually cropped/expanded to a square format before stitching). On the Image Parameters tab, set approximate yaw values for the images (there's a "Fill yaw" button at the bottom to automate this task). Set control points
and optimize as usual: start off by optimizing lens fov and
yaw and on all images except one (the anchor). Then optimize fov
and y,p,r on all images except the anchor, and lens parameter
b. Repeat with the shift parameters d and e included to correct
for an off-centre lens. Optimize fov and y,p,r
on all images except the anchor, and lens parameter a. Then
do the same for lens parameter c. Go round again for the lens
parameters b,a,c. <br><br>When you've got a good
result, add in the zenith and nadir images (remember to set the
crop circle the same as the other images), assign just a few control
points to attach them to the original images and optimize for y,p,r
on only the two new images. |
|
|
|
|
|
|
|
PATCHING THE ZENITH AND NADIR You can check the basic panorama file with PTViewer. There should only be small holes or rough edges at the zenith and nadir. To patch these with some invisible stitching, it is necessary to go through a rather special process of extracting a view of the zenith/nadir areas and patching in the separately taken views using Photoshop. The patched zenith/nadir is then copied back into the full panorama. You can do this with either PanoCube Plus, Pano2QTVR or PTEditor (included in Panorama Tools). PANOCUBE PLUS: Convert each of the two equirectangular files produced above to 6 cube faces. To do this, set the parameter "Create tiles for editing" in the script.txt file. Merge the pairs of images for the nadir and zenith in Photoshop. Use PanoCube Plus to reconstitute the final panorama image from the amended set of cube faces. You do this by dragging any one of the tile images onto PanoCube. Use Pano2QTVR in a similar way to generate a set of 6 cubic tiles, edit the zenith nadir and then build an equirectangular image from the edited tiles. PTEDITOR: Open the panorama file and you will have a window display rather like PTViewer. Use the up arrow key to tilt the panorama as far as it will go to display the zenith. Now click Edit->Extract Partial View and save to a file called zenith.tif. Leave the window open and open a new copy of PTEditor and extract a partial view from the zenith/nadir file in exactly the same way. Load both partial views into Photoshop layers and merge the two so that the hole is covered up. Don't expect the two images to match up exactly. You can select a circular image of the patch and use Edit->Free Transform to pull it into the right position (with the upper layer transparency reduced to 50%). Apply a layer mask and edit the join so the seam is invisible. Save the edited zenith back to file zenith.tif. Now return to the first PTEditor window and select Edit->Insert Saved View. This will copy your edited zenith file back into the panorama. Do the same for the nadir and then save the edited panorama file. This completes the job. My finished panorama can be seen at Woods Panorama. NB. PTEditor may be subject to a memory limitation that prevents it from processing panorama images larger than about 4000x2000. You can increase the amount of memory assigned to Java using the command line option -Xmx<size>. Example: 'java -jar -Xmx400m pteditor.jar' This setting launches pteditor with 384MB of RAM and enables 8000x4000 panos. For convenience, you can use notepad to create a .bat file called ptedit.bat containing this command and put it in the same folder as PTEditor. Create a shortcut to it on the desktop with right-click->New>Shortcut. Double clicking this shortcut opens PTEditor with 384MB RAM.
|
|
|
|
VIEWING THE PANORAMA You can view the panorama as it stands using PTViewer or FSPViewer. If you want to view it with the QuickTime viewer, you can convert the equirectangular file to a cubic panorama (.mov) using the free utilities Pano2QTVR from http://www.pano2qtvr.com or PanoCube from http://www.panoshow.com/panocube.htm . Pano2QTVR has a gui interface whereas with PanoCube you just drag & drop the panorama file onto the PanoCube icon and it will generate the .mov file in the same folder. Avoid using spaces in file names or folder names in the paths. It is important that the equirectangular file has an aspect ratio of exactly 2:1. For example, a 4000x2001 file will not be processed by PanoCube. Both Pano2QTVR and PanoCube are freeware, but paid for versions with extra features are also available. |
|
|
|
DISPLAYING THE PANORAMA IN A WEB PAGE This is an example of the HTML code needed to display your panorama file with PTViewer: <applet code="ptviewer.class" width="480"
height="390" archive="ptviewer.jar"> In addition, you need to include the following files from the PTViewer package (Java Applet and Application V2.5) in the same folder as your panorama file: ptviewer.jar plus the 13 .class files in the PTViewer\_1\$VFS folder from the Stuffit archive supplied. (To unpack, use Aladdin expander from http://www.aladdinsys.com ). PanoCube has an option in the script.txt file to output an HTML file for displaying the .mov file.
LINKS Panorama Tools: http://www.all-in-one.ee/~dersch/ |
|
|
|
Written
by John Houghton |
|